Wednesday, September 21, 2011


Tuesday, August 30, 2011
Tuesday, May 17, 2011
My Julianna Collection is slowly but surely coming together. So far I have 5 pieces completed and will be adding an additional frame and altered canvas to the finished bunch.
This is the first project I have been able to use these Martha Stewart butterfly punches on and they are now my new favorite punch! The butterflies turn out so intricate and delicate yet they are sturdy enough (using a good quality cardstock) to handle the wear and tear of a finished project. I highly recommend you check out the entire line of butterfly punches that she has created. They come in a variety of sizes, borders, corners and the like.
Check them out at your favorite craft store or MarthaStewartCrafts.com I was able to find them at Michaels as well.


This is the first project I have been able to use these Martha Stewart butterfly punches on and they are now my new favorite punch! The butterflies turn out so intricate and delicate yet they are sturdy enough (using a good quality cardstock) to handle the wear and tear of a finished project. I highly recommend you check out the entire line of butterfly punches that she has created. They come in a variety of sizes, borders, corners and the like.
Check them out at your favorite craft store or MarthaStewartCrafts.com I was able to find them at Michaels as well.


Saturday, April 30, 2011
Tapestry Collection Finally Finished!
FINALLY finished this collection! It has taken me forever to complete because I have so many projects going all at once. This consists of an altered notepad, an altered wood frame from Michaels, an altered paper mache box an altered pair of salt and pepper shakers and a glass tile necklace featuring vintage brass and all made from a single piece of paper that reminded me of the beautiful tapestry baggage carried by Victorian women on long sea voyages.


Monday, April 25, 2011
Sunday, April 17, 2011
Adorable Teapot Box and Matching Cup.
I absolutely LOVE this project from Julianna of ILuvVintagescrap She did an amazing job using paper from the new DCWV paper pad named "Tradewinds". I was able to snag the last pad of this paper at my local Joann's as my fellow scrappers from all over have been eagerly snapping up all the new pads from DCWV such as the Tradewinds, Tattered Time, Royal Garden, and The Lemon Flower stacks.
DCWV really scored when they created these winning paper stacks and I am now starting to see all the gorgeous projects being made with them. Very inspiring indeed. Check out Julianna's project and be sure to take note of the links she provides if you are interested in purchasing the template used to create this gorgeous project.
*Please remember to pause the music at the bottom of the page before enjoying the video.
DCWV really scored when they created these winning paper stacks and I am now starting to see all the gorgeous projects being made with them. Very inspiring indeed. Check out Julianna's project and be sure to take note of the links she provides if you are interested in purchasing the template used to create this gorgeous project.
*Please remember to pause the music at the bottom of the page before enjoying the video.
Thursday, March 31, 2011
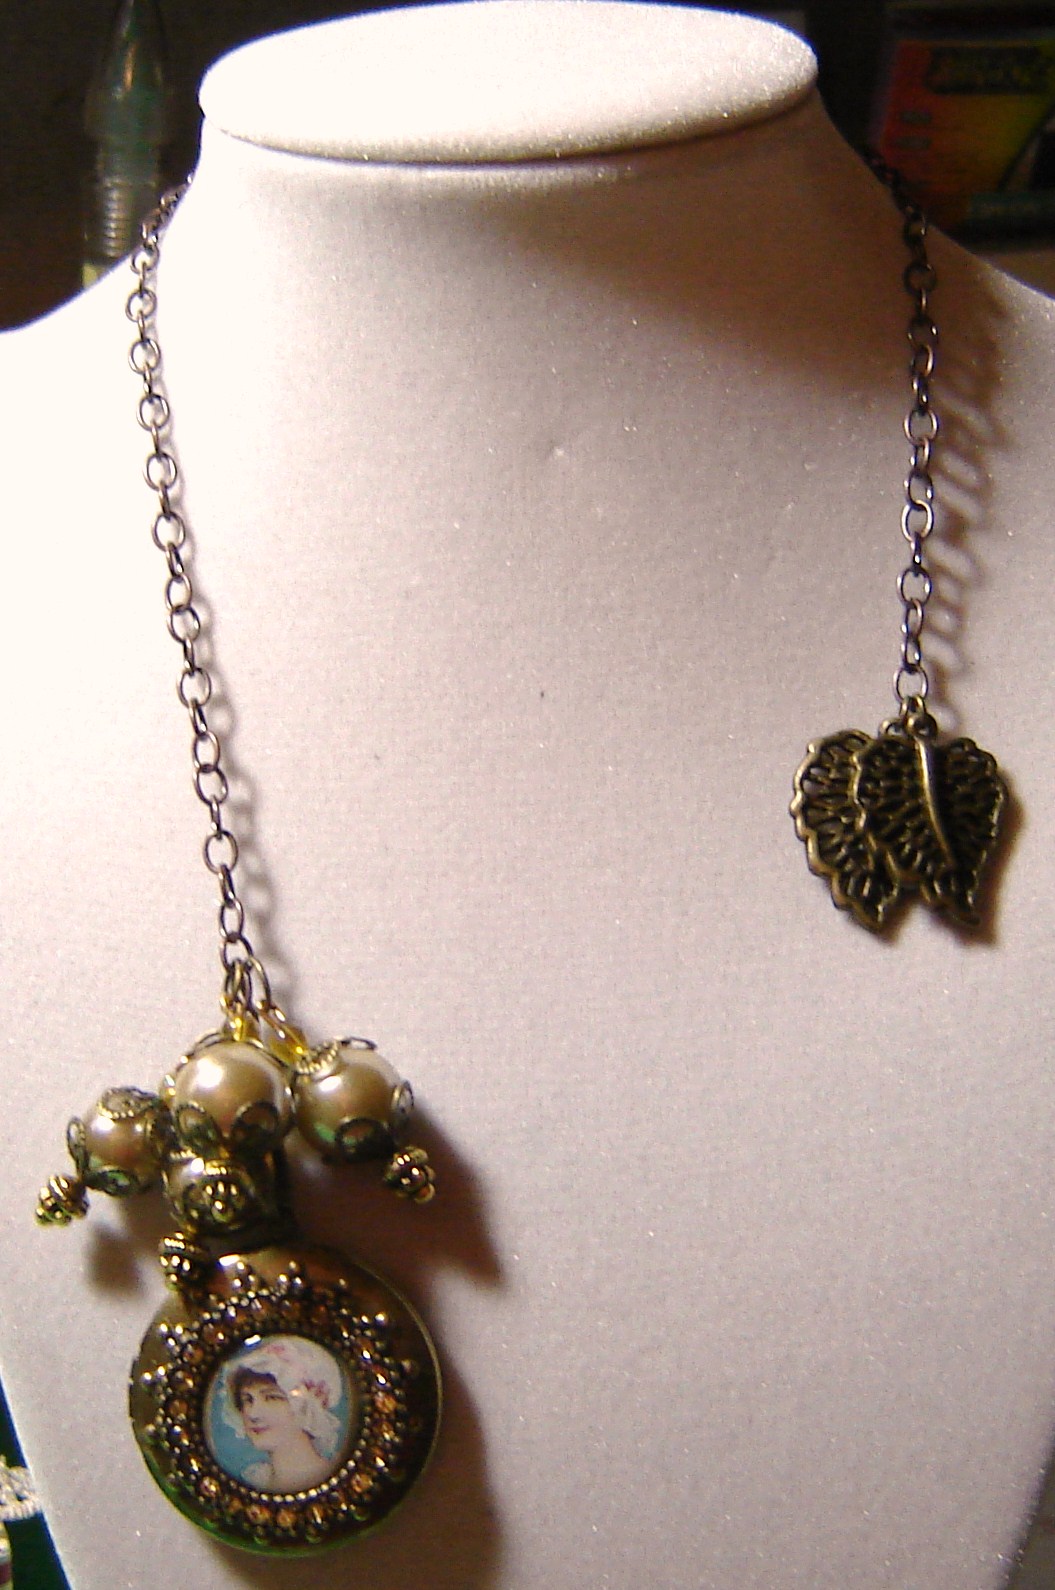
Vintage Inspired Chain Bookmark.
I just love chain style bookmarks and this one is my new favorite. I am reading several books at once and needed several bookmarks that would not slip out like the receipts and scraps of paper lying around that I have been using.
This was so simple to make. I used a locket style pendant from Michaels, glass pearls and brass bead caps and findings along with 2 leaf charms and Voila! I love it because all you have to do when you finish reading is lay it down the crease of the page and close the book. Then you have a beautiful dangle at both ends of the book.

This was so simple to make. I used a locket style pendant from Michaels, glass pearls and brass bead caps and findings along with 2 leaf charms and Voila! I love it because all you have to do when you finish reading is lay it down the crease of the page and close the book. Then you have a beautiful dangle at both ends of the book.
Thursday, March 24, 2011
Altered Journal For Box.
It seems like I've been working on this project forever but it is getting close to being finished now. I am adding the finishing touches to the journal that will go inside the box now. I found myself searching all over town last weekend in search of the perfect ribbon to attach the coordinating bookmark with and I finally found it.
The journal will go inside the box with a few other journaling goodies like a matching pen and sweets. I received the beautiful Victorian box feet in the mail the other day and am super excited to get those on and see how it looks. Thanks for following the progress of this very special project for my mother.

The journal will go inside the box with a few other journaling goodies like a matching pen and sweets. I received the beautiful Victorian box feet in the mail the other day and am super excited to get those on and see how it looks. Thanks for following the progress of this very special project for my mother.

Thursday, March 17, 2011
I've been a box making fool these last few weeks. Here are a few others that are currently in progress. The first one is for my mom who loved the prize one I did for the Superbowl. I plan to create a matching gratitude journal to keep inside the box. The second box will hold a set of matching greeting cards and envelopes and it will go to my lovely mother-in-law.
The first one showcases one of the Flowersoft display globes that are used to display just about anything you like on cards and other projects. The second one has a built in frame so a photo can be slipped in from the top.


The first one showcases one of the Flowersoft display globes that are used to display just about anything you like on cards and other projects. The second one has a built in frame so a photo can be slipped in from the top.


Sunday, February 6, 2011
Victorian Box.
Finally a new project! I've been so busy lately and have neglected my poor little blog for so long. I have never stopped creating but just have not had the time to drag out the camera and film a video. Anyhow I hope you enjoy this little project and sorry the video is so short but my camera battery was not cooperating with me in the least...lol
*Please remember to pause the music at the very bottom of the screen before watching the video.
*Please remember to pause the music at the very bottom of the screen before watching the video.
Monday, January 10, 2011
Awesome Deals On Saturday.
Boy did I hit the jackpot at my local Michael's on Saturday. They were having huge price cuts on most items in the store. Take a peek at my video to see the great deals that I came across.
*Please pause music below before starting the video.
*Please pause music below before starting the video.
Friday, December 31, 2010

So how's that for a little break from the blogospere! I'm still here but have been swamped and a bit overwhelmed by everyday life..lol I have continued to create and will have a few projects to share with you all in the coming days and weeks so keep checking back with me. In the meantime enjoy this beautiful vintage image and go create something beautiful!
Saturday, November 20, 2010
This Is Not Your Grannie's Pressure Cooker!

I have always liked to consider myself to be somewhat of a gourmet cook -*looks down at manicure smugly*- but the one thing I have always shied away from is pressure cooking. The thought of that stove top monster blowing sky high in my kitchen has always prevented me from giving it a try. The anticipation of making one wrong move and KABOOM is more than I can handle. Heck, I even cringe at the anticipation of the tin popping when you peel the roll off of the refrigerated biscuits!
Well just the other evening things changed for me. As I sat watching t.v. with wet nails and was just too lazy to change the channel an infomercial for the new Living Well With Montel Williams Pressure Cooker came on. I had flipped passed this one before while channel surfing but this time I watched and WOW! was I impressed. This little baby was not only safe but it cooked foods extremely fast.
So to make a long story short I'll be giving this baby a try soon! I did some research and found that it was being sold on QVC for a lot cheaper than the infomercial price so I'll be ordering from there on Black Friday for the best deal. Check out the infomercial below if you'd like to see why I was so impressed.
So to make a long story short I'll be giving this baby a try soon! I did some research and found that it was being sold on QVC for a lot cheaper than the infomercial price so I'll be ordering from there on Black Friday for the best deal. Check out the infomercial below if you'd like to see why I was so impressed.
*Please pause the music below before watching.
Sunday, October 24, 2010
Wild Orchid Crafts.
Lately it seems that paper flowers-or mulberry flowers to be exact-are my thing. They are so delicate and beautiful and really soften the look of all my vintage art projects. Just one flower added to a project can add a very soft and feminine look to the whole piece. For a time I was using silk flowers but they just seemed to look hard and a bit out of place to me. Maybe its that they have that ugly nylon backing as leaves that just never lays right...who knows.
I was first introduced to Mulberry paper flowers by Prima Marketing. They carry some amazingly beautiful flowers made from a variety of materials but WOWZA are they expensive! I set out to find a similar type of flower somewhere else and it seemed that all the stores wanted to carry were the Prima ones...boo.
While watching videos on Youtube I found a gal who ordered some very pretty flowers from Crafta.com and I placed and order. The flowers were amazing and just as nice as Prima for a far more reasonable price.
Then last week I saw several other videos with flowers from Wild Orchid Crafts. I placed and order with them and WOW!! These flowers are superior to any others I have seen available! The detail is amazing and the colors are gorgeous. Take a peek at at the video below as I share my them with you.
*Pause music below before starting video.
I was first introduced to Mulberry paper flowers by Prima Marketing. They carry some amazingly beautiful flowers made from a variety of materials but WOWZA are they expensive! I set out to find a similar type of flower somewhere else and it seemed that all the stores wanted to carry were the Prima ones...boo.
While watching videos on Youtube I found a gal who ordered some very pretty flowers from Crafta.com and I placed and order. The flowers were amazing and just as nice as Prima for a far more reasonable price.
Then last week I saw several other videos with flowers from Wild Orchid Crafts. I placed and order with them and WOW!! These flowers are superior to any others I have seen available! The detail is amazing and the colors are gorgeous. Take a peek at at the video below as I share my them with you.
*Pause music below before starting video.
Saturday, October 2, 2010
Faux Cloisonne Paper Frame Technique.
I recently ordered some beautiful Cloisonne beads from Ebay that got my creative juices going. As I was examining each bead it occurred to me that this same technique could be easily duplicated on paper! I dug through my stash and came up with some inexpensive paper frames from the dollar store.
The technique is fast and extremely easy and I was able to create something almost identical to my inspiration bead. This technique can be applied to almost anything and I will be trying all kinds of new surfaces. Take a look at the video below to see this easy technique for yourself.
*Please Remember To Pause The Music Below Before Starting Video.
The technique is fast and extremely easy and I was able to create something almost identical to my inspiration bead. This technique can be applied to almost anything and I will be trying all kinds of new surfaces. Take a look at the video below to see this easy technique for yourself.
*Please Remember To Pause The Music Below Before Starting Video.
Friday, September 17, 2010
Great New Class!
This is an awesome opportunity to learn a new skill and to make something beautiful at the same time! Nataliebramasole is offering a class on Mixed Media Workshops that will teach you how to create her beautiful and one of a kind bookcards! I have seen her bookcards on Youtube and believe me when I say there is nothing else like them out there. She uses beautiful embellishments placed with intricate detail and the results are just stunning.
She mentions in the video that she is offering the class to show how to make them because shipping from Belgium to America is so expensive and has been a barrier for some who would like to have had one of her bookcards. You can sign up for the class directly from the "Mixed Media" link above if you are interested. Also, check out the video below for more information and visit her Youtube channel to see an awesome assortment of her bookcard creations.
*Please remember to pause music below before watching video.
She mentions in the video that she is offering the class to show how to make them because shipping from Belgium to America is so expensive and has been a barrier for some who would like to have had one of her bookcards. You can sign up for the class directly from the "Mixed Media" link above if you are interested. Also, check out the video below for more information and visit her Youtube channel to see an awesome assortment of her bookcard creations.
*Please remember to pause music below before watching video.
Saturday, September 11, 2010
Saturday, September 4, 2010
A Post Worth Repeating!

You have seen them everywhere. You will find them at office supply stores, scrapbook parties and most recently in craft stores. They are tag guns and although they can add a lot of really cool things to your cards, layouts, and paper crafts; they can also add years of heartache and illness to your life if not used correctly.
Tag guns or paper taggers as they are more commonly known to the craft world are used to attach and affix any number of items to a surface using flexible plastic "T" tags that penetrate and catch the surface of whatever you are attaching it to. The tags are widely available in a variety of colors.
The use of these fun tag guns will come at a high price for many if they are not used properly. This is because a tag gun needle stick is no different than a hypodermic needle stick! Now that I have your attention let me explain why this can be so extremely dangerous. When you accidentally prick your finger with a tag gun (which is guaranteed to happen at some time or another) you expose the needle tip to bio hazardous material, namely your blood. The pricked area usually stops bleeding after a quick second but the danger is by no means over. It is when you then share your tag gun with others that the real danger presents itself.
For instance, you are at a scrapbook party and you bring your tag gun along. You accidentally stick your finger and set it down. Someone else picks it up and uses it and sticks themselves. Yet another person uses it and does the same thing! Finally you go to use it again and stick yourself once more. You have now been exposed to the possible blood borne pathogens of the two others that just used your gun!
 Blood borne pathogens can include such things as hepatitis, MRSA, HIV and AIDS! Remember, tag gun needle sticks are no different than hypodermic needle sticks. You may think that cleaning the gun with alcohol or bleach after each person would remedy the problem but you would be wrong. Tag guns have a 3 part mechanism that does not allow for them to be cleaned at all three points (the inside of the needle barrel) with a simple household cleaner. Although you can purchase specialty cleaners ; most people are not aware that they will need one when sharing their gun and they inadvertently put themselves and others at risk.
So how can you enjoy the use of a tagging gun in your arts and crafts while remaining safe at the same time? The best practice would be to never share your gun with another person. Make sure that everyone present respects your decision not to share your gun as well. The other option would be to purchase one of the specialty cleaners designed specifically for the cleaning of tag gun needles and mechanisms.
This post was very important to me as I was recently stuck by one of these guns. Later that night I began to think about it and decided to do a bit of research. I was floored by what I found and therefore wanted to share my findings with you. I have since been to the Dr. and everything has turned out fine but WOW what a scare. I urge you all to be safe, be alert, and be educated about the potential risks of using these tag guns. They can be wonderful tools for your arts and crafts when used safely and correctly.
Sunday, August 29, 2010
Sunday, August 22, 2010
A Beautiful Mess!
My hubby and I have been the messiest and laziest we have ever been in our lives but we have a great exscuse, I promise! Take a peek at the video below and you'll understand why. :)
*Please remember to pause music down below first.
*Please remember to pause music down below first.
Subscribe to:
Posts (Atom)




.jpg)


